Autonomous Scanning Image Acquisition with Elios 3

Elios 3 users can now automate image acquisition across large planar surfaces with AutoScan. This feature helps teams capture consistent, photogrammetry-ready datasets for faster data navigation and detailed 3D inspection.

A photogrammetric inspection requires systematic image acquisition, with consistent coverage, sufficient overlap, and an appropriate level of detail. Achieving this manually across large surfaces can be demanding for the pilot and may lead to gaps or inconsistencies in the dataset. Navigating hundreds of individual images can also make it difficult to locate and assess defects in context.

AutoScan overcomes these challenges by automating image acquisition and enabling inspection data to be turned into cohesive 3D models for easier analysis.

In this article, we’ll explore the benefits of AutoScan, how it works, where it can be used, and what you need to get started.

What AutoScan Can Do for Your Inspections?

Consistent Coverage: For photogrammetry, images need sufficient overlap and a consistent level of detail. AutoScan follows a scan pattern based on the area, target resolution, and overlap you define, reducing the manual work involved and helping limit gaps in the dataset.

Easier Data Navigation: Once processed in compatible photogrammetry software, the images form a 3D model you can navigate. This makes it easier to locate areas of interest and return to the source images for a closer look.

3D Defect Assessment: A feature or defect may extend beyond a single photograph. Viewing it in 3D helps you understand its shape, extent, and position on the asset, while giving colleagues a shared reference for discussing findings.

Ready for Photogrammetry: Export the captured images and their associated position and orientation data to compatible photogrammetry software for 3D reconstruction and analysis.

AutoScan Launch Video
 

Where You Can Use AutoScan 

AutoScan is designed to capture images across large planar surfaces. The resulting datasets can support different types of inspection, mapping, and documentation:

Infrastructure: Civil and structural engineers, inspection companies, and asset owners can use AutoScan to document concrete surfaces such as facades, bridge pillars, and retaining walls. The resulting 3D models can support structural inspection, defect documentation, condition assessment, and measurement.

Mining: Mining engineers, geologists, geotechnical teams, and mine operators can use AutoScan to document exposed rock surfaces in mine walls, stopes, and drawbells. The resulting 3D models can support geological mapping, rock-mass assessment, and geotechnical analysis—including in areas where geologists cannot safely collect observations in person.

Industrial & Warehousing: Facility managers, warehouse managers, logistics teams, and inspection providers can document storage racks, high-bay areas, and other large vertical surfaces. These datasets can support asset inspection and condition assessment, while repeated scans can help teams document changes over time.

Photogrammetry Services: Surveyors, drone service providers, and 3D-reconstruction specialists can use AutoScan for systematic image capture across suitable infrastructure, mining, and industrial assets. The datasets can then be processed in compatible photogrammetry software to deliver 3D models, maps, and inspection data to clients.

While AutoScan can support a range of applications, the geometry of the asset is an important consideration. AutoScan flies a flat flight plan at a fixed distance from the surface you define. On curved assets such as tanks, silos, or chimneys, that distance changes across the scan, which affects image resolution and overlap. For these assets, we recommend a stepped flight plan: split the asset into several smaller scan blocks, each covering a section that is close to flat. Separately, very uniform or symmetrical spaces, such as long featureless galleries, offer few references for the drone's positioning system and can cause drift.

What Can a Scan Reveal About an Inaccessible Rock Face?

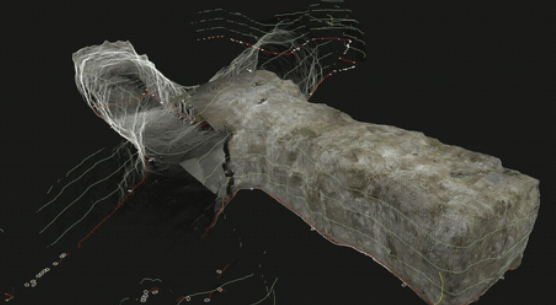
At an underground mine in the United States, a drawbell had never been geologically characterized because its interior could not be accessed safely. During field testing, the Elios 3 captured data from inside the opening while personnel remained in supported ground. Processed into detailed photogrammetric models, the datasets allowed the geology team to review structural features remotely.

We documented this mission in the following white paper, including:

  • The capture workflow: AutoScan settings used underground.
  • The software comparison: geological detail across four processing platforms.
  • The geologists’ assessment: what the models revealed and what still needed field verification.

Read the Geological Mapping White Paper →


3D model of the underground mine


Field Feedback

See what inspection teams using AutoScan have to say about their experience in the field.

Director of Research & Robotics Services at Gedeon GRC Consulting logo
Miles Kilcourse Director of Research & Robotics Services at Gedeon GRC Consulting
"AutoScan helped us evaluate a more systematic approach to photogrammetry data collection on difficult-to-access bridge components. The resulting datasets showed strong potential for existing-condition documentation, engineering review, and future Scan-to-BIM workflows."
Read the full case study
Managing Director at Medexon logo
Dirk Caestecker Managing Director at Medexon
"AutoScan is really unlocking new business for us... Things we couldn't deliver in the past and customers were asking for... now it unlocks a lot of potential to bring value to your customers."
 

How AutoScan Works 

The AutoScan workflow takes you from scan setup to 3D inspection in eight steps:

1. Set up your AutoScan mission
Configure the image overlap and target resolution, position the Elios 3, and define the scan area using three Points of Interest.

2. Run the AutoScan mission
AutoScan generates the flight pattern and automatically captures images across the defined surface.

3. Review the scan in Inspector
Transfer the flight data to Inspector to review the trajectory, point cloud, and captured images in their spatial context.

4. Export the photogrammetry dataset
Export the original images and their associated pose information from Inspector.

5. Import into photogrammetry software
Import the images and pose data into compatible photogrammetry software and apply the corresponding Flyability configuration.

6. Process the dataset
Process the overlapping images and spatial information to reconstruct the scanned surface as a detailed 3D mesh.

7. Inspect the result
Navigate the 3D model, locate areas of interest, access the corresponding source images, and examine features directly in 3D.

8. Export for further analysis
Export the reconstructed model to compatible third-party inspection software for further analysis, measurement, and reporting.

Watch the video below to see the complete AutoScan workflow in action.


For more details on image acquisition and photogrammetric reconstruction with AutoScan, explore the AutoScan Technical White Paper.

Which Photogrammetry Software Is Compatible with AutoScan? 

The resulting dataset can be processed in any photogrammetry software that supports image import, a separate CSV pose file, and a supported fisheye camera model. This includes:

  • PIX4D
  • Bentley
  • Metashape
  • GNext Labs
  • Spotscale

See the level of detail that can be achieved from an AutoScan capture in the 3D model below, processed with Bentley.

3D model Video

Explore the 3D model yourself

What You Need to Use AutoScan

AutoScan is integrated directly into Cockpit, so no additional software or interface is needed for image acquisition.

Premium Software Subscription

AutoScan is available through the Premium Software Subscription, which also includes access to Inspector Online, advanced autonomy features, and ongoing software improvements.

Tether Power Unit (Recommended)

AutoScan is designed to capture large planar surfaces. We recommend using it with the Tether Power Unit to cover larger areas in a single mission. Continuous power means fewer interruptions and less time spent landing, swapping batteries, and repeating setup steps.

You can also use standard Elios 3 batteries, but a scan cannot resume after a battery change. You’ll need to define and launch a new mission block to capture the remaining area.

Contact our team to discuss the right setup for your AutoScan missions.

Ready to Bring AutoScan Into Your Inspection Missions? 

Bring automated image acquisition into your Elios 3 inspection workflow. Talk to our team to find the right setup for your operations and get started with AutoScan.

Explore AutoScan Resources

FAQ

What export formats are available from Inspector?
Inspector allows you to export the original images as JPEG files, along with a CSV file containing the associated pose information.  

Can I use AutoScan without a Tether Power Unit?
Yes. AutoScan can be used with standard Elios 3 batteries. For longer missions, the Tether Power Unit is recommended to provide continuous power and avoid interruptions for battery changes.

Can I continue a scan after changing the battery? 
The same mission cannot resume after a battery change. You’ll need to define and launch a new mission block to capture the remaining area.

Does AutoScan create the 3D model automatically?
AutoScan automates image acquisition. To create a photogrammetric 3D model, export the captured images and their associated position data from Inspector, then process them in compatible photogrammetry software.

Can AutoScan scan any type of surface?
AutoScan is designed for large planar surfaces and flies a flat flight plan. The drone does not adjust its distance to the surface if the geometry changes, so on curved assets such as tanks or silos, image resolution and overlap vary across the scan. For these assets, use a stepped flight plan made of several smaller scan blocks. Very uniform or symmetrical spaces, such as long featureless galleries, can also cause positioning drift. 


Table of contents

    SEE ALSO